Client Download and Installation
The client program is standalone, and can be placed anywhere convenient on your system, such as your Home folder. Download the appropriate file from the list below and place it into your desired location.
Windows
To install on Windows, simply download the openbeacon.exe file into any convenient location.
OS X
To install on OS X, download the provided archive file and unarchive it in a convenient location. The provided library file (ending in .dylib) must stay in the same folder as the binary.
Linux
Download the Linux binary file to any convenient location. The 32-bit libusb-0.1.4 or greater library must be installed on your system prior to using the binary. Use your distribution’s package manager to install the libusb. For example, on Ubuntu and other Debian-based distributions, the command is:
$ sudo apt-get install libusb-0.1-4:i386
Download Links
Linux Client
Windows Client
OS X Client
Using The Client
Regardless of whether you are using Windows, OS X, or Linux, you will need to open a command prompt in order to use the client program. Before executing the program, be sure your command prompt is in the same directory as the client program by using the “cd” command to navigate to the directory.
In Linux and OS X, invoke the Openbeacon client program in a command prompt with the following command:
$ ./openbeacon
On a Linux PC, you may need to invoke the client program as superuser (unless proper permissions are set in rules.d, which will be covered later)
$ sudo ./openbeacon
Note that you may need to first set the client program as executable
$ chmod +x openbeacon
In Windows, open a Command Prompt window from the Start menu. Be sure that you are in then same directory as your client program, then you just need to type the client program name to execute it:
C:\> openbeacon
Invoking the client without any command line arguments brings up the help:
$ ./openbeacon
OpenBeacon Usage:
./openbeacon status
    Display the current operating parameters of the OpenBeacon

./openbeacon modelist
    List all available mode names and their descriptions

./openbeacon mode <modename>
    Set the operating mode to <modename>

./openbeacon wpm <speed>
    Set the keying speed to <speed> (only in CW mode)

./openbeacon msg1 <buffer>
    Set Message Buffer 1 to <buffer> (enclose in quotation marks)

./openbeacon msg2 <buffer>
    Set Message Buffer 2 to <buffer> (enclose in quotation marks)

./openbeacon buffer1
    Set Message Buffer 1 to active

./openbeacon buffer2
    Set Message Buffer 2 to active

./openbeacon glyph <glyphnumber> <glyphdata>
    Load custom glyph data <glyphdata> into glyph <glyphnumber>

./openbeacon wsprbuffer <buffer>
    Load WSPR buffer with channel symbols <buffer>

./openbeacon msgdelay <delay>
    Set the message repeat delay to <delay> minutes (0 sets immediate repeat)

./openbeacon dfcwoffset <offset>
    Set the DFCW frequency offset amount (0 - 255)

./openbeacon tx
    Initiate a message transmission
Use the status command to see the current operating parameters
$ ./openbeacon status
Mode: dfcw3 -- Dual Frequency CW - 3 second dits
Message Buffer 1: N0CALL
Message Buffer 2: MSG2
Active Buffer: 1
Message Delay: 0
DFCW Offset: 100
As you can see, the default message is “N0CALL”. We obviously need to change that before putting OpenBeacon on the air. Enclose the buffer text in quotes (to ensure that special characters such as a forward slash get sent correctly, use single quotes around the buffer text):
$ ./openbeacon msg1 "NT7S CN85NM"
Message Buffer 1: NT7S CN85NM
Message Buffer 2: MSG2
Active Buffer: 1
Message Delay: 0
DFCW Offset: 100
Let’s take a look at all of the modes available in the OpenBeacon
$ ./openbeacon modelist
       dfcw3 -- Dual Frequency CW - 3 second dits
       dfcw6 -- Dual Frequency CW - 6 second dits
      dfcw10 -- Dual Frequency CW - 10 second dits
     dfcw120 -- Dual Frequency CW - 120 second dits
       qrss3 -- QRSS - 3 second dits
       qrss6 -- QRSS - 6 second dits
      qrss10 -- QRSS - 10 second dits
     qrss120 -- QRSS - 120 second dits
          cw -- CW
        hell -- Sequential Multi-tone Hell
        wspr -- WSPR (experimental, see documentation)
   glyphcode -- Glyphcode
         cal -- Calibration
The string on the left side is what to type to change to the mode indicated on the right. Let’s change the mode to CW
$ ./openbeacon mode cw
Let’s check the status again to verify the changes
$ ./openbeacon status
Mode: cw -- CW
WPM: 5
Message Buffer 1: NT7S
Message Buffer 2: NT7S CN85nm
Active Buffer: 1
Message Delay: 0
DFCW Offset: 100
As you can see, while in CW mode, the keying speed is indicated. Let’s change it to 15 WPM
$ ./openbeacon wpm 15
And now let’s check the status one more time to check that the CW speed is correct
$ ./openbeacon status
Mode: cw -- CW
WPM: 15
Message Buffer 1: NT7S
Message Buffer 2: NT7S CN85nm
Active Buffer: 1
Message Delay: 0
DFCW Offset: 100
By default, with a Message Delay of 0, OpenBeacon will continuously repeat the message in the buffer. You can set a message delay so that it will repeat the message only after a certain number of minutes have elapsed. The command
$ ./openbeacon msgdelay 10
will repeat the message every 10 minutes. This is helpful when you want to use “stacking” to dig out a weak signal (stacking is where multiple grabber captures are combined together).
If you don’t like the default FSK offset for DFCW mode, you can change that as well. The command takes an argument from 0-255. This number does not correspond to any particular measurement of frequency offset. Instead, it is a relative scale of the tuning of the varactor diode. Since the tuning voltage/capacitance ratio is non-linear, this parameter will also have a non-linear response. However, by monitoring your own signal, it is easy to adjust this value to your liking.
$ ./openbeacon dfcwoffset 150
Finally, you may restart the transmission of a message buffer with the tx command. The current message buffer is transmitted from the beginning, interrupting whichever state that OpenBeacon is currently in. You probably will not need this command in normal usage, as it was mainly added to support the experimental WSPR mode. This essentially replicates the function of button S1.
$ ./openbeacon tx
udev Rules for Linux
Many Linux distributions will require you to add a rule to the udev system in order to have non-superuser access to OpenBeacon via USB. The following instructions are written specifically for Ubuntu, but should be applicable for most other distributions as well.
All of these commands are issued via terminal, so open one up to get started.
We will create a new rules file with the following command:
$ sudo nano /etc/udev/rules.d/10-openbeacon.rules
Copy and paste the following text into the first line of the nano text editor:
SUBSYSTEMS=="usb", ATTRS{idVendor}=="16c0", ATTRS{idProduct}=="05dc", GROUP="adm", MODE="0666"
Press Ctrl-O to save the rules file, then Ctrl-X to exit. Finally, we need to restart udev, so issue the following command in the terminal:
$ sudo restart udev
If your OpenBeacon is currently plugged in, disconnect it then connect it again. You should now have non-superuser access to OpenBeacon via the client program.
WSPR
WSPR is still considered “experimental” but should work OK for you if you do your calibration correctly. The first thing to do when setting up WSPR is to be sure that your maximum frequency deviation as described in the last section is at 10 Hz. Double-check it and adjust it if necessary.
Next, you will need to generate the channel symbols for your WSPR message. In the official WSPR software package, there is a utility called wsprcode (If running Windows, you can download the file here). Run this command with the desired transmission string in quotation marks as the single argument (this will be your callsign, your grid square, and your power level in dBm).
$ ./wsprcode "NT7S CN85 23"
Message: NT7S CN85 23

Source-encoded message (50 bits, hex): A1 03 77 DD 56 75 C0

Data symbols:
      1 0 0 0 1 1 0 1 0 1 0 1 1 0 1 1 0 1 0 1 1 0 0 1 0 1 0 0 0 0
      0 1 1 0 1 0 1 0 0 1 1 0 0 0 1 1 1 0 1 1 0 1 0 1 1 0 1 1 1 1
      0 0 1 1 0 0 0 1 1 1 1 1 1 1 1 1 1 1 1 1 1 1 0 0 1 0 0 1 1 0
      0 0 1 1 0 0 0 0 1 0 0 1 1 0 1 0 0 1 1 1 1 1 0 0 0 1 0 0 0 0
      1 1 1 1 0 0 1 1 1 1 0 1 0 1 1 0 0 1 0 1 0 1 0 0 1 0 0 0 1 0
      1 1 0 0 0 0 0 0 0 0 1 1

Sync symbols:
      1 1 0 0 0 0 0 0 1 0 0 0 1 1 1 0 0 0 1 0 0 1 0 1 1 1 1 0 0 0
      0 0 0 0 1 0 0 1 0 1 0 0 0 0 0 0 1 0 1 1 0 0 1 1 0 1 0 0 0 1
      1 0 1 0 0 0 0 1 1 0 1 0 1 0 1 0 1 0 0 1 0 0 1 0 1 1 0 0 0 1
      1 0 1 0 1 0 0 0 1 0 0 0 0 0 1 0 0 1 0 0 1 1 1 0 1 1 0 0 1 1
      0 1 0 0 0 1 1 1 0 0 0 0 0 1 0 1 0 0 1 1 0 0 0 0 0 0 0 1 1 0
      1 0 1 1 0 0 0 1 1 0 0 0

Channel symbols:
      3 1 0 0 2 2 0 2 1 2 0 2 3 1 3 2 0 2 1 2 2 1 0 3 1 3 1 0 0 0
      0 2 2 0 3 0 2 1 0 3 2 0 0 0 2 2 3 0 3 3 0 2 1 3 2 1 2 2 2 3
      1 0 3 2 0 0 0 3 3 2 3 2 3 2 3 2 3 2 2 3 2 2 1 0 3 1 0 2 2 1
      1 0 3 2 1 0 0 0 3 0 0 2 2 0 3 0 0 3 2 2 3 3 1 0 1 3 0 0 1 1
      2 3 2 2 0 1 3 3 2 2 0 2 0 3 2 1 0 2 1 3 0 2 0 0 2 0 0 1 3 0
      3 2 1 1 0 0 0 1 1 0 2 2

Decoded message: NT7S CN85 23             ntype: 23
That last set of numbers called the “Channel symbols” is all that you will need from the output. Copy the string of numbers (there should be 162 total) and paste them into your favorite text editor. Remove all spaces, tabs, carriage returns, etc. so that you only have a single string of 162 numbers from 0 to 3 remaining (why the wsprcode program doesn’t output this way is a mystery).
Now, issue the command to the client program to load them into your OpenBeacon (don’t use the channel symbols below, those are for NT7S!).
./openbeacon wsprbuffer "310022021202313202122103131000022030210320002230330213212223103200033232323232232210310221103210003002203003223310130011232201332202032102130200200130321100011022"
All you will need to do now is to re-align your transmit frequency to make sure you are in the WSPR sub-band. On 30 meters, the WSPR sub-band is just above the QRSS sub-band, starting at about 10.140.100 MHz and ending at about 10.140.300 MHz. Use the method described in the calibration section above to reset your frequency.
For a final check that everything is working, run the WSPR program to verify that you will get a proper decode from the OpenBeacon (and that you are indeed in-band). In WSPR mode, OpenBeacon will not transmit automatically. There are two ways to initiate a transmission: manually with button S1 or with the client program:
$ ./openbeacon tx
Initiate a transmission on an even UTC minute as indicated on the WSPR client program clock (start it from between :00 and :01 seconds). After two minutes, you should see a nice strong signal in the WSPR program and get a decode of your own message which you encoded earlier.
The best way to run OpenBeacon in WSPR mode continuously is to tether it to a PC, so that the PC can automatically handle initiation of transmission at the appropriate time. See the Time Synchronization via PC section below for details on how to set this up.
Glyphcode

Glyphcode transmits a set of two customizable glyphs as Morse Code, one glyph is the dah and the other is the dit. As you can see in the example above, the dah glyph is a long bar and the dit glyph is a round dot. These are the pre-loaded glyphs, but you can load your own through the client program, as demonstrated below.
A glyph is fixed at 7 rows high and can be a maximum of 22 columns wide. Each glyph column is encoded as a 7-bit binary number, with the least significant bit indicating the topmost pixel. Right now, you’ll have to calculate the number representing each column manually, but it’s easy to do with graph paper. Draw your glyph fitting the dimensions specified above, then assign values to each of the rows in ascending power of 2 order (1, 2, 4, 8, 16, 32, 64). For each pixel that is turned on in the column, add the corresponding row numbers together.
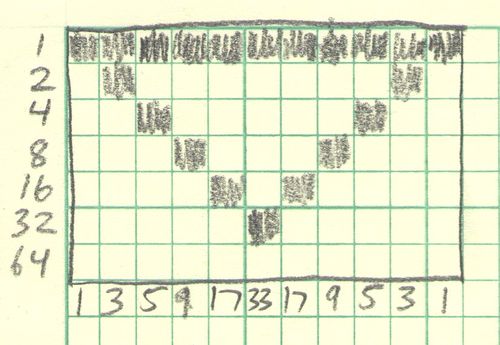
Now take those numbers and enter them into OpenBeacon using the client program, using commas to delimit each number.
./openbeacon glyph 1 "1,3,5,9,17,33,17,9,5,3,1"
The first argument above (1) indicates glyph number 1, which is the dah. To change the dit, indicate glyph number 2.
Time Synchronization via PC
Although OpenBeacon does not have GPS synchronization capability, it can be tethered to a PC via USB in order to initiate transmissions on command of the PC. When the PC is clock-disciplined via NTP or some other method, OpenBeacon transmissions can be synchronized well enough to meet the demands of WSPR. Below are the steps you will need to take to implement this on your PC.
Sync PC with Time Server
Windows
Windows has an “Internet Time” function built into the OS. This capability may or may not be good enough to meet your synchronization needs, but if you find it is not, try a third party program as mentioned below.
(Note that these instructions may vary slightly based on your version of Windows) Navigate to Control Panel > Date & Time Click on “Internet Time” tab Check the box “Synchronize with an Internet time server”
If you find that the Windows “Internet Time” function is not working well enough for you, you may want to try a third party NTP client program. A popular freeware program is Dimension 4, which can be downloaded here. Follow the instructions listed on the web site to install and run Dimension 4.
OS X
Navigate to System Preferences… > Date & Time Make sure “Set date and time automatically” is checked.
Linux
There are too many Linux variants to give detailed instructions on how to set this for your distribution, but there should be a system setting to synchronize your clock to an Internet server. Please consult your distribution’s documentation for details.
Scheduling via cron
The most flexible and powerful scheduling software which is available for Windows, OS X, and Linux is cron. It comes installed by default on OS X and Linux systems. A third party program must be used to install it on Windows. It works by looking at a configuration file (called crontab) and executing a command or program based on the time criteria you specify in text format.
The cron format may look a bit obscure, but it is actually rather simple. The crontab file is a text file, where each line contains one scheduled task. There are 6 fields to specify: minute, hour, day, month, day of week, and the command to be executed. Each of these are separated by a whitespace. Numbers are used to specify each of the first 5 fields, and you may specify “all” by using a “*”. See the Wikipedia article for details of the specification.
Let us assume for this example, that we wish to initiate a WSPR transmission every 10 minutes, that we are using a Linux OS, and that the openbeacon executable is in the /home/foo folder. The crontab entry will then look like this:
*/10 * * * * /home/foo/openbeacon tx
The first parameter (/10), indicates that the program should execute every 10 minutes. The rest of the “” indicate that the program should run every hour, day, month, and day of the week. Finally, the last parameter is the actual command to be executed; in this case, openbeacon tx to initiate a transmission.
Below is the OS specific instructions on how to setup cron for transmissions, using the example crontab command specified above. If you want to initiate transmissions on a different schedule, you will need to modify the example file.
Windows
Since Windows does not ship with cron capability, a third party program will have to be installed in order to use it. There are a handful of options available, but some are fairly complicated to install. Perhaps the most simple to install and use is called nnCron Lite, which we will be using for our example. Go to the nnCron website, download the nnCron Lite installer (currently labeled nncronlt117.exe), and execute the installer, accepting all of the defaults.
Now that nnCron Lite is installed, the crontab file will need to be modified for our command. nnCron Lite uses the name cron.tab for this file, instead of crontab as found on OS X and Linux systems. Using Windows Explorer, navigate to C:\Program Files\nnCron Lite (or possibly C:\Program Files (x86)\nnCron Lite if you are running 64-bit Windows). Open the cron.tab file using your favorite text editor, then add the appropriate crontab entry somewhere in the file. For this example, we will assume that the OpenBeacon executable resides in C:\Users\Foo:
*/10 * * * * C:\Users\Foo\openbeacon.exe tx
We can now start the nnCron Lite service in order to start the transmissions. There is a file called startcron.bat in the nnCron Lite folder which you can execute, or you can use the entry in the Start Menu to accomplish the same thing. When you are finished with your transmissions, there is a stopcron.bat file which will stop the service for you.
OS X
Since cron is already pre-installed on OS X, all we will need to do is edit the crontab file and put in our command. Open a terminal, and type:
crontab -e
This will open up the crontab file in the vi text editor. On a blank line, type in the appropriate crontab entry (making sure that the last parameter correctly points to the path of your OpenBeacon executable). Be sure to put a newline at the end of your crontab entry. When you are finished, save and exit by typing:
:wq
That’s it. To verify that your crontab entry was placed correctly, you can type at a terminal prompt:
crontab -l
Since cron is a daemon which runs continuously, your OpenBeacon will keep transmitting on the specified schedule whenever it is hooked up to your PC. If you would like to disable the crontab entry to stop this, use the crontab -e command to edit crontab, then place a “#” in front of your crontab entry. This will comment the line out, causing cron to ignore it. Of course, once you are ready to use it again, just remove the “#”.
Linux
Different Linux distributions may handle cron slightly differently, but most should have the crontab command available. If you find that your distribution does not, please consult your documentation.
Open up a terminal window and edit the crontab file by issuing the following command:
crontab -e
You may get a prompt like this if you have never run crontab before:
Select an editor.  To change later, run 'select-editor'.
  1. /bin/ed
  2. /bin/nano        <---- easiest
  3. /usr/bin/vim.tiny

Choose 1-3 [2]:
Selecting nano is recommended, as it is the most simple editor to use (If you choose vi, please consult the OS X instructions above).
On a blank line, type in the appropriate crontab entry (making sure that the last parameter correctly points to the path of your OpenBeacon executable). Be sure to put a newline at the end of your crontab entry. When you are finished, save and exit by typing Ctrl-O, then Ctrl-X.
To verify that your crontab entry was placed correctly, you can type at a terminal prompt:
crontab -l
Since cron is a daemon which runs continuously, your OpenBeacon will keep transmitting on the specified schedule whenever it is hooked up to your PC. If you would like to disable the crontab entry to stop this, use the crontab -e command to edit crontab, then place a “#” in front of your crontab entry. This will comment the line out, causing cron to ignore it. Of course, once you are ready to use it again, just remove the “#”.